 Save
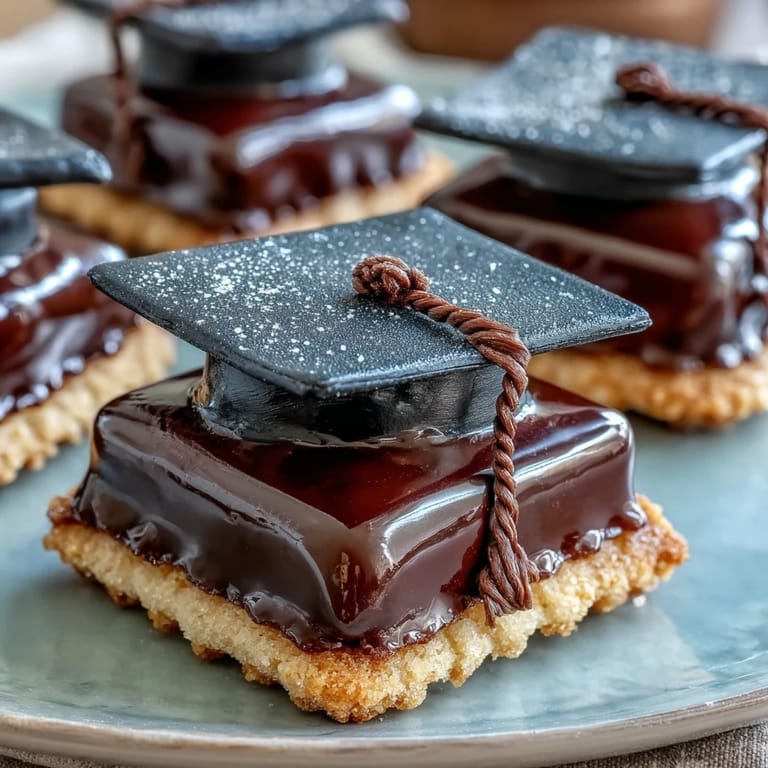
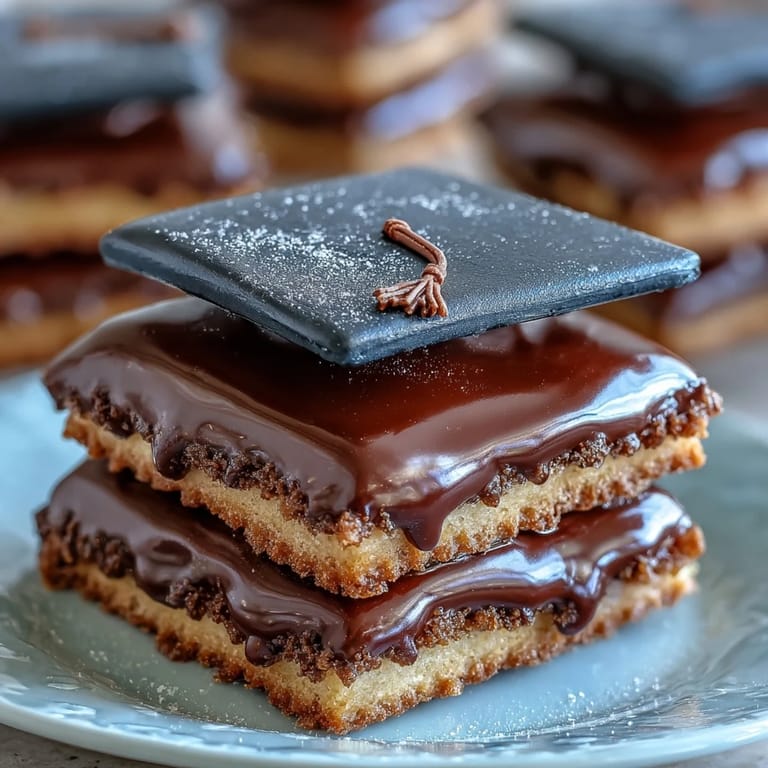
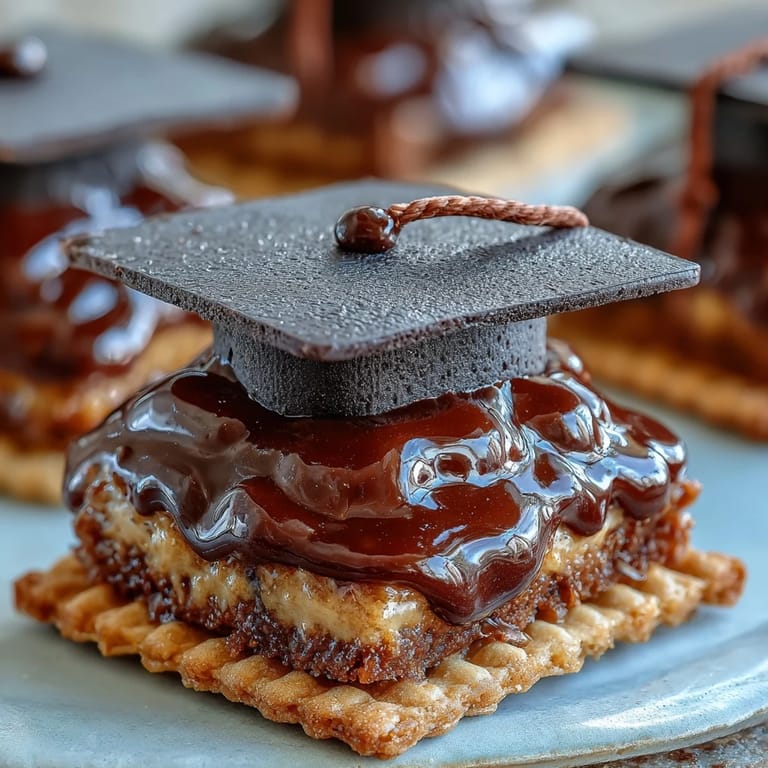
Save My friend texted me a photo of her daughter's graduation cap mid-throw, and I realized I had exactly three days to create something special for the celebration dessert. Standing in my kitchen that evening, I thought about how a simple sugar cookie could carry so much meaning—something the graduate could hold in their hand, bite into, and taste the sweetness of an accomplishment. That's when the idea hit: what if I topped these cookies with tiny fondant mortarboards, little edible symbols of the journey they'd just completed? The cookies are buttery and tender, but it's those charming graduation hats that make them unforgettable.
I made these for my niece's graduation open house last spring, and watching her classmates pick them up with genuine delight was worth every minute of rolling fondant. One girl actually asked if she could save hers instead of eating it—she taped it to her dorm mirror. That moment made me realize these cookies were doing something beyond feeding people; they were creating little keepsakes of a milestone moment.
Ingredients
- All-purpose flour: The foundation of your cookie—make sure it's measured by weight if you can, because scooping straight from the bag often packs too much in.
- Baking powder: Just enough to give these cookies a tender crumb without making them cake-like; don't skip it.
- Salt: Brings out the vanilla and balances the sweetness in a way you won't notice until it's missing.
- Unsalted butter, softened: Room temperature is non-negotiable here—cold butter won't cream properly and you'll end up with dense cookies.
- Granulated sugar: Creaming this with butter is where the magic happens; those few minutes create air pockets that make cookies tender.
- Large egg: Binds everything together and adds richness; use room temperature for best incorporation.
- Pure vanilla extract: Don't reach for the imitation; real vanilla makes a noticeable difference in flavor.
- Black fondant: This forms the mortarboard squares and bases—buy pre-colored if you want to save yourself the mess of kneading in food coloring.
- Yellow fondant: The tassel accent that brings the whole design together; you could also use gold for a fancier look.
- Cornstarch: Your best friend when rolling fondant—it prevents sticking without toughening the fondant the way flour would.
- Powdered sugar and milk: Mixed together, this icing acts as an edible adhesive holding your fondant pieces in place.
Tired of Takeout? 🥡
Get 10 meals you can make faster than delivery arrives. Seriously.
One email. No spam. Unsubscribe anytime.
Instructions
- Prep your workspace and oven:
- Heat the oven to 350°F and line two baking sheets with parchment paper; this step takes thirty seconds but prevents burnt cookie bottoms and stuck cookies.
- Mix your dry ingredients:
- Whisk the flour, baking powder, and salt together in a medium bowl, making sure there are no lumps hiding in the corners. This distributes the leavening evenly so every cookie rises and bakes at the same rate.
- Cream the butter and sugar:
- In a large bowl, beat softened butter and sugar together for 2-3 minutes until the mixture looks pale and fluffy; you're incorporating air that makes cookies tender. Stop occasionally and scrape down the bowl sides because butter likes to hide up there.
- Bring in the egg and flavor:
- Add the egg and vanilla, beating until everything looks smooth and emulsified. If it looks slightly broken or curdled, that's fine—it'll come together once you add the flour.
- Combine wet and dry:
- Add the flour mixture in three additions, stirring gently after each one; mix just until you don't see flour streaks anymore, then stop. Overmixing develops gluten and toughens cookies, and nobody wants a tough cookie.
- Roll and cut:
- Lightly flour your work surface and roll the dough to 1/4-inch thickness, then cut into 2 1/2-inch shapes—rounds are classic, but squares actually work better with the mortarboard design. Chill the cut cookies on the baking sheet for 10 minutes if your kitchen is warm; cold cookies spread less and hold their shape better.
- Bake until golden:
- Slide into the oven for 10-12 minutes, watching until the edges are just golden but the centers still look slightly underbaked; they'll firm up as they cool. Pull them out when you think they might need another minute—that's when they're perfect.
- Cool completely:
- Let cookies sit on the hot baking sheet for a minute, then transfer to a wire rack to cool entirely before decorating. Warm cookies won't hold fondant properly.
- Prepare your fondant pieces:
- Dust your work surface with cornstarch and roll black fondant to 1/8-inch thickness, then cut 24 small squares (about 1 1/4-inch) for the mortarboard tops. Roll 24 tiny cylinders about 1/2-inch long and 1/4-inch thick for the bases—these look more polished if they're smooth and uniform.
- Create the tassel accents:
- Roll yellow fondant into thin ropes and snip into 1-inch pieces; gently shape each one into a tassel by pinching one end. If fondant gets sticky, dust with cornstarch, but don't overdo it or it'll dry out and crack.
- Mix your icing glue:
- Stir powdered sugar, milk, and vanilla until you get a consistency that's thick enough to hold shape but thin enough to spread slightly. It should look like thick glue, not frosting.
- Decorate each cookie:
- On each cooled cookie, use a small dab of icing to center and attach a black fondant square, then stick a fondant cylinder underneath it as the base. Add a tiny dot of icing to one corner and press the yellow tassel in place.
- Let decorations set:
- Give everything 20-30 minutes to firm up before packaging or serving; fondant needs time to bond with the icing.
 Save
Save A few weeks after my niece's party, her mom sent me a photo of the cookie still sitting on her desk at her first office job—she'd kept it in a small box as a reminder of everyone who cheered her on. That's when I understood: these cookies aren't really about sugar and butter, they're about marking a moment that matters.
Customizing for Your Graduate
The beauty of these cookies is that they're a blank canvas for personalization. I've made versions with school colors by blending fondant—mixing red and white for pink, adding blue to black for deep purple, layering colors on the tassel. One time I even piped the graduate's initials on the mortarboard square using icing, which took an extra five minutes but looked incredibly thoughtful. You could also stamp fondant with a small impression tool to add details, or swap the yellow tassel for a different color entirely.
Making Ahead and Storage
The cookies themselves keep beautifully, which is a huge advantage when you're planning a celebration. I usually bake them two days before the event, store them in an airtight container, and then decorate the morning-of when I have fresh energy. If you're really planning ahead, you can even freeze unbaked dough discs for up to three months; just add a minute or two to the baking time straight from frozen. The decorated cookies stay fresh in an airtight container for up to five days, though honestly, they rarely last that long once people know they're available.
Shortcuts and Substitutions Without Judgment
Let's be honest—sometimes you're short on time or just not feeling the full from-scratch project. There's zero shame in using store-bought sugar cookie dough and pre-colored fondant; the mortarboard decoration is still charming and personalized, and nobody will know you didn't mix the dough yourself. I've also made these with a simple powdered sugar glaze instead of fondant for a cleaner, more delicate look, and they're equally beautiful. The core idea of celebrating your graduate with a thoughtful treat is what matters, not how many steps you personally take to get there.
- Swap the homemade dough for quality store-bought dough and skip the mixing step entirely.
- Pre-colored fondant saves the mess of kneading in food coloring, though it costs a bit more.
- If fondant isn't your thing, decorate with royal icing and edible markers instead—totally different aesthetic, equally impressive.
 Save
Save These cookies have a way of becoming more than dessert—they become little edible memories of a milestone worth celebrating. Make them, give them with joy, and watch the surprise and delight on your graduate's face.
Recipe FAQ
- → What type of fondant is best for decorating?
Use pliable black and yellow fondant for shaping mortarboards and tassels. It rolls easily and holds shapes well.
- → How can I store these decorated cookies?
Store in an airtight container at room temperature for up to five days to maintain freshness and decorations.
- → Can these cookies be made gluten-free?
Yes, substitute all-purpose flour with a gluten-free blend and ensure fondant ingredients are gluten-free as well.
- → What is the best way to achieve smooth icing for attaching fondant?
Mix powdered sugar, milk, and vanilla until smooth and spreadable; it works well as edible glue for fondant pieces.
- → How thick should the cookie dough be rolled?
Roll the dough to about 1/4-inch thickness for even baking and sturdy cookies that hold decorations.