 Save
Save My cousin texted me three weeks before her graduation asking if I could bring something to the party, and I immediately thought of cupcakes with those tiny graduation caps on top. There's something about making desserts for big moments that feels like you're baking the celebration itself into every bite. I'd seen these cap toppers online and thought they looked impossible until I actually tried assembling one at my kitchen counter with nothing but chocolate, candy, and a tiny bit of patience. What started as nervous fumbling turned into the most satisfying little craft project, and by the time I'd made twelve, I couldn't stop grinning at how perfect they looked lined up on the cooling rack.
Watching my cousin's face light up when she saw the cupcakes at her party made the whole process worth it. She grabbed one immediately and didn't even care about the frosting, just wanted to examine the tiny cap topper and figure out how I'd glued it all together. Her friends started asking if I made them, and suddenly I was taking orders for three other graduation parties that summer.
Ingredients
- All-purpose flour: The foundation of a tender crumb; sifting it isn't absolutely necessary, but it does help you avoid dense pockets.
- Granulated sugar: Creaming this properly with butter for a full minute makes a real difference in how light your cupcakes turn out.
- Unsalted butter: Use the softened kind so it incorporates smoothly, and taste matters here since you're controlling the salt level yourself.
- Large eggs: Room temperature eggs blend in more evenly, so pull them out of the fridge while you're prepping other ingredients.
- Whole milk: This adds moisture without heaviness; don't swap it for water or your cupcakes will taste a bit too cake-like.
- Baking powder: This is your leavening agent, so make sure yours isn't sitting in your pantry from last year.
- Pure vanilla extract: The real stuff makes a noticeable difference in flavor compared to imitation.
- Powdered sugar: Sifting this before you use it prevents lumps in your frosting and saves you from the frustration of grainy buttercream.
- Mini peanut butter cups: These form the actual cap of your graduation hat; choose a brand you like since it's a principal ingredient, not just decoration.
- Chocolate square candies: These become the base of your cap, so pick ones that are sturdy enough to hold weight.
- String licorice or sour candy strips: These serve as the tassel hanging down; the flavor doesn't matter much, just pick what looks right in your school colors.
- Mini M&Ms or candy pearls: The tiny button on top of the cap adds the finishing touch and won't roll off if you choose a slightly flatter candy.
Tired of Takeout? 🥡
Get 10 meals you can make faster than delivery arrives. Seriously.
One email. No spam. Unsubscribe anytime.
Instructions
- Prep your pans and oven:
- Set your oven to 350°F and line a muffin tin with paper liners; this takes two minutes but saves you from cupcakes that stick and tear.
- Cream the butter and sugar:
- Beat them together for about a minute until the mixture looks pale and fluffy, which means you've incorporated enough air for a light crumb. This is where patience pays off, so don't rush it.
- Add eggs one at a time:
- After each egg, wait a few seconds for it to fully blend in before adding the next one, then stir in the vanilla extract.
- Mix dry ingredients separately:
- In another bowl, whisk together flour, baking powder, and salt to distribute the leavening evenly before you add it to the wet ingredients.
- Combine wet and dry in alternating batches:
- Add half the flour mixture, stir, then add the milk, then the remaining flour, stirring just until you don't see streaks of flour anymore. Overmixing at this stage makes tough cupcakes.
- Fill liners and bake:
- Divide batter evenly among the twelve liners until they're about two-thirds full, then bake for 18 to 20 minutes until a toothpick inserted in the center comes out clean. They'll feel soft on top but will continue to cook as they cool.
- Cool completely before frosting:
- This is crucial; warm cupcakes will melt your frosting, so give them at least 30 minutes on a rack.
- Make the buttercream:
- Beat softened butter until smooth, gradually add sifted powdered sugar to avoid lumps, then add milk, vanilla, and a pinch of salt, beating until it reaches a fluffy, spreadable consistency.
- Frost with confidence:
- Dollop frosting onto each cooled cupcake and swirl it with a spoon or piping bag; the frosting should be generous enough to hold your cap topper securely.
- Assemble the graduation caps:
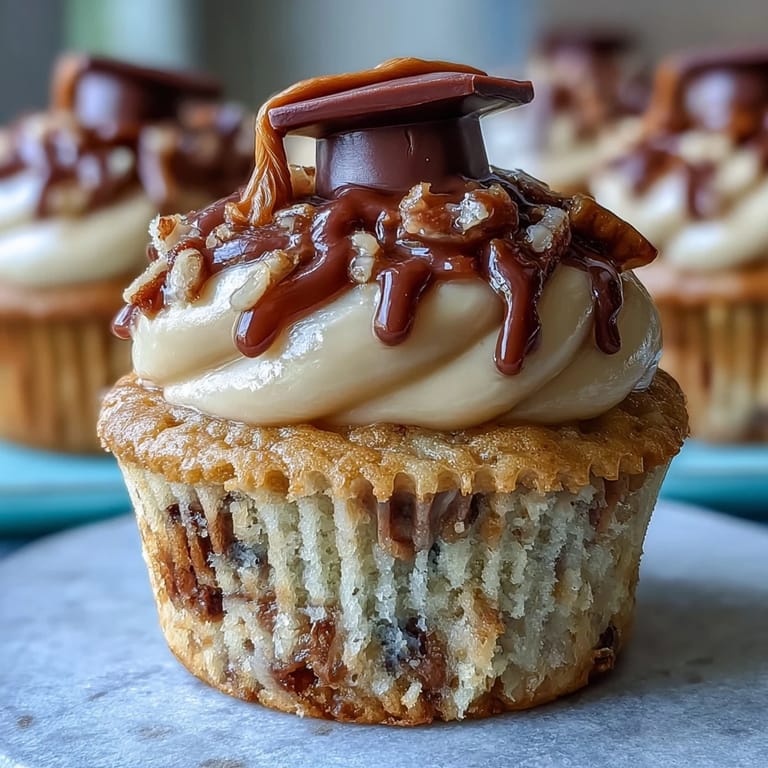
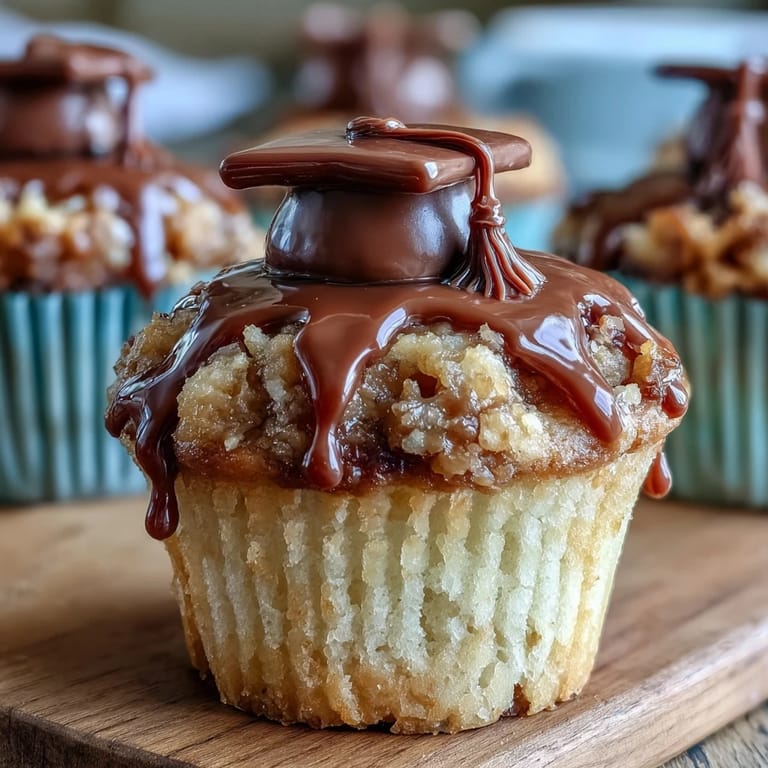
- Place a chocolate square flat-side up, attach the mini peanut butter cup upside-down in the center with a tiny dab of melted chocolate or frosting, add a piece of licorice as the tassel, and top with a mini M&M, letting everything set for a few minutes before placing the cap on the cupcake.
 Save
Save A few months later, I ran into my cousin at the grocery store and she told me someone at the party had asked for my phone number to hire me for their wedding desserts. It wasn't the cupcakes that made the difference, really; it was that tiny moment where people saw something they could celebrate with, something made by hand just for them.
Making the Caps Feel Personal
The beauty of these graduation cap toppers is that you can customize them to match your school colors or the graduate's favorite candies. I've made versions with red licorice for one school and twisted green string candy for another, and each time it felt like the cupcakes became more meaningful because they were tailored specifically to that person. Food coloring stirred into the buttercream frosting opens up even more possibilities, so don't feel locked into vanilla white.
Storage and Timing
These cupcakes actually improve slightly after a day because the crumb sets and becomes more tender, so you can bake them the day before the event without any guilt. The frosting keeps them fresh in an airtight container at room temperature for up to two days, and if you need them to last longer, the unfrosted cupcakes freeze beautifully for up to a month. Just thaw them completely before frosting, and no one will ever know they weren't made that morning.
Troubleshooting and Variations
If you end up with cupcakes that are a bit dry, the culprit is usually overbaking, so set a timer and check them at 18 minutes rather than waiting the full 20. If your frosting is too soft to hold the cap topper, pop it in the refrigerator for ten minutes to firm up slightly. Some people have asked me about swapping ingredients, and honestly, the vanilla can be replaced with almond extract, or you can add cocoa powder to make chocolate cupcakes if you want something richer.
- For nut allergies, skip the peanut butter cups entirely and use extra chocolate squares or any flat candy you prefer.
- Make sure any candies you're using for the toppers haven't been stored in a warm place or they'll be sticky and difficult to work with.
- If you're making these more than a few hours ahead of serving, store the assembled caps separately and attach them right before the event so they stay looking crisp and defined.
 Save
Save Every time I make these cupcakes, I'm reminded that the best part of cooking isn't really about following a recipe perfectly. It's about taking a moment to celebrate someone, and these little cakes with their ridiculous tiny graduation caps are the most joyful way I know to do it.
Recipe FAQ
- → What ingredients are used for the cupcake base?
The base uses all-purpose flour, granulated sugar, softened butter, eggs, whole milk, baking powder, salt, and vanilla extract for a classic moist texture.
- → How are the cap toppers assembled?
Caps are crafted by stacking a chocolate square with a mini peanut butter cup below, attaching a licorice tassel and a mini candy as a button, secured with melted chocolate or frosting.
- → Can these cupcakes be adapted for nut allergies?
Yes, swap mini peanut butter cups with chocolate squares to avoid nuts and ensure safe celebratory treats.
- → What’s the best way to store these cupcakes?
Store in an airtight container at room temperature for up to two days to maintain freshness and frosting texture.
- → Is it possible to customize the frosting color?
Food coloring can be added to the buttercream frosting to match school colors or party themes for a personalized touch.