 Save
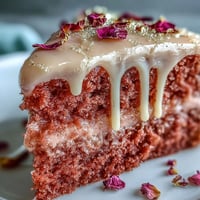
Save My hands were shaking a little when I pulled this cake out of the oven—not from nerves about baking, but from the weight of what it represented. A friend's kid was graduating high school, and I'd volunteered to make something special, something that would sit in the center of their kitchen table and announce to everyone that yes, we did it, they made it through. The smell of vanilla and butter filling the kitchen felt like its own kind of celebration, warm and golden, the kind that makes you want to invite people over just to share in it.
I remember the afternoon light coming through the kitchen window as I was leveling the cake layers, and my mom walked by and just stopped, watching me work. She didn't say much, just smiled—the kind of smile that meant she understood why I was taking my time with this, why getting the frosting smooth mattered. When we finally set that little diploma topper on top and stepped back, even she said it looked like something worth celebrating. That's when I realized this cake had become less about technical skill and more about showing up for someone you care about in a way that says I see your accomplishment, and it matters.
Ingredients
- All-purpose flour (2 ½ cups): This is your cake's foundation—make sure it's fresh and airy by spooning it gently into your measuring cup rather than packing it down, or your cake will end up dense.
- Baking powder (2 ½ tsp): Don't skip the sifting step when you mix this with flour, because lumps of baking powder will create weird pockets in your crumb.
- Salt (½ tsp): Just a pinch, but it brightens the vanilla and balances the sweetness in a way you don't expect until it's missing.
- Unsalted butter (1 cup for cake, 1 ½ cups for frosting): Room temperature is non-negotiable—cold butter won't cream properly and you'll end up with a gritty texture instead of that fluffy cloud you're after.
- Granulated sugar (2 cups): This dissolves into the butter and eggs, creating the structure that holds your cake together, so don't substitute brown sugar here.
- Eggs (4 large, room temperature): Cold eggs won't emulsify properly with the butter, so pull them out of the fridge while you're prepping other ingredients.
- Vanilla extract (1 tbsp for cake, 2 tsp for frosting): Pure vanilla tastes noticeably better than imitation, especially when vanilla is the star of the show.
- Whole milk (1 cup for cake, 3–4 tbsp for frosting): Room temperature milk mixes in smoothly without shocking the batter or making it seize up.
- Powdered sugar (5 cups, sifted): Sifting removes lumps and makes your frosting incredibly smooth and spreadable, not grainy.
- Edible gold foil sheets: These are delicate and need a light touch—always use tweezers or ensure your hands are completely dry before handling them.
- Diploma-shaped cake topper: You can buy these ready-made for convenience, or make one from fondant and edible markers if you want everything to be edible.
Tired of Takeout? 🥡
Get 10 meals you can make faster than delivery arrives. Seriously.
One email. No spam. Unsubscribe anytime.
Instructions
- Set the stage:
- Preheat your oven to 350°F and grease those pans generously—I mean really coat them with butter or baking spray, then line them with parchment paper so your cakes slip out without any drama. This double step is worth the thirty seconds it takes.
- Mix your dry ingredients:
- Whisk flour, baking powder, and salt together in a medium bowl, making sure everything is evenly distributed so you don't get surprise pockets of baking powder. I like to do this over the bowl to aerate the flour a little.
- Cream the butter and sugar:
- Beat softened butter and sugar together on medium-high speed for about 3-4 minutes until it's pale, fluffy, and looks almost like the color of wet sand. You'll know it's ready when you can't feel any grittiness if you rub it between your fingers.
- Add the eggs one at a time:
- Drop in one egg, beat it until you can't see streaks anymore, then add the next one—this might seem tedious, but it's what keeps your cake tender instead of dense. After all four eggs are in, stir in your vanilla extract.
- Alternate flour and milk:
- Now here's the move that separates a good cake from a great one: start with some of your flour mixture, beat it in gently, then add some milk, then more flour, ending with flour. This method keeps the batter from becoming too thin or too thick, and it prevents overmixing, which is a common mistake that makes cakes tough.
- Divide and smooth:
- Pour the batter evenly between your two prepared pans and smooth the tops with an offset spatula so they'll bake evenly. If you tilt the pans slightly side to side, gravity will help you out.
- Bake until golden:
- Bake for 28-32 minutes until a toothpick inserted in the center comes out clean—this usually happens right around the 30-minute mark. You're looking for a light golden color on top and a gentle spring-back when you touch the center lightly.
- Cool with patience:
- Leave the cakes in their pans for 10 minutes so they set just enough to handle, then turn them out onto wire racks to cool completely. Trying to frost a warm cake is a recipe for sliding buttercream and disappointment.
- Make the buttercream:
- Beat softened butter on high speed for about 3 minutes until it's pale and creamy, then gradually add your sifted powdered sugar so it doesn't puff up and coat your kitchen in white dust. Once it's combined, add vanilla, a pinch of salt, and milk one tablespoon at a time until you reach a consistency that's smooth and spreadable but still holds its shape.
- Level your cakes:
- If your cakes have domed tops, carefully slice them off with a serrated knife or cake leveler so you have two flat surfaces that will stack evenly. This step makes a huge difference in how professional your finished cake looks.
- Build the cake:
- Place one cake layer on your serving plate, spread a thick layer of buttercream on top (about ¼ inch), then carefully set the second layer on top. Use a turntable if you have one—it makes this step so much easier.
- Apply the crumb coat:
- Spread a thin, almost transparent layer of frosting all over the cake to seal in any loose crumbs, then pop it in the fridge for 30 minutes. This crumb coat is invisible but essential—it keeps your final frosting layer looking pristine.
- Final frosting:
- Once the crumb coat is set, frost the entire cake smoothly with your remaining buttercream, using an offset spatula and a light touch. If you rotate the cake as you go, you'll get that smooth, bakery-quality finish.
- Add the gold foil:
- Using tweezers (or completely dry fingers), carefully apply edible gold foil sheets to your cake in whatever pattern feels right—I usually do scattered pieces around the sides and maybe a small accent on top. Work slowly because this foil is delicate, but it's also very forgiving if a piece crumples slightly.
- Crown it with meaning:
- Place your diploma topper at the center or off to one side of the cake, add any sprinkles or star confetti if you're using them, and step back to admire what you've created. Chill briefly to set everything, then serve at room temperature so the cake is soft and the frosting has the best texture.
 Save
Save There's something almost ceremonial about decorating a graduation cake, like you're acknowledging that this moment matters. I stood there with a small piece of gold foil caught on my tweezers, thinking about how this cake would be photographed, shared, and talked about—not because it's technically perfect, but because it represents someone's hard work and a family's pride. That's the real magic of making something like this, and it has nothing to do with buttercream consistency.
Why Vanilla Works Here
Vanilla might seem simple, but it's actually the most elegant choice for a celebration cake because it lets the focus stay on the person you're celebrating, not on competing flavors. The warm, subtle sweetness of good vanilla extract creates a backdrop that makes the gold foil and diploma topper shine instead of fighting for attention. It's the kind of flavor that feels both timeless and present-day, which somehow matches the feeling of graduation itself.
The Frosting-to-Cake Ratio
I've made this cake three times now, and I learned something important on the second attempt: more frosting isn't always better. A generous but not excessive layer between the cakes and a smooth coating on the outside lets the cake itself be tasted, not just the sugar. The buttercream should enhance and protect, not bury, and when you get that balance right, people actually taste the care you put in.
Decorating Day Decisions
The decorating phase is where your personality gets to show up, and that's the part I love most about this recipe. You can go minimalist with just the diploma topper, or you can be playful with sprinkles and gold foil scattered everywhere—the cake doesn't judge. Edible gold foil, in particular, makes even a slightly imperfect frosting job look intentional and fancy, which is a small gift we can give ourselves when we're baking for others.
- If you don't have edible gold foil, pearl dust mixed with a tiny bit of vodka makes a beautiful shimmer effect that's just as elegant.
- The diploma topper can be made ahead and stored in a cool, dry place, so you can decorate the cake the morning of the celebration without stress.
- Don't frost the cake more than a few hours before serving—buttercream can soften in warm rooms, and the cake tastes best when it's had a chance to come back to room temperature.
 Save
Save This cake tastes like celebration and takes about two hours from start to finish, which means it's fancy enough to feel special but achievable enough that you won't regret volunteering to make it. That's the real mark of a good recipe—it brings joy without bringing stress.
Recipe FAQ
- → What type of flour works best for this cake?
All-purpose flour provides the perfect structure and texture for the vanilla sponge in this cake.
- → How is the edible gold foil applied to the cake?
Using tweezers, gently place the delicate gold foil sheets onto the frosting to avoid tearing or sticking.
- → Can the buttercream be colored to match school colors?
Yes, gel food coloring can be added to the buttercream to achieve vibrant, school-specific colors.
- → What is the best way to ensure the cake layers are even?
Level cooled cakes with a serrated knife or cake leveler before frosting to create smooth, even layers.
- → How should the cake be stored before serving?
Keep the cake chilled after decorating and bring to room temperature before serving for optimal flavor and texture.
- → Is it possible to make the diploma topper edible?
Yes, create the topper from fondant and decorate using edible markers for a fully edible accent.