 Save
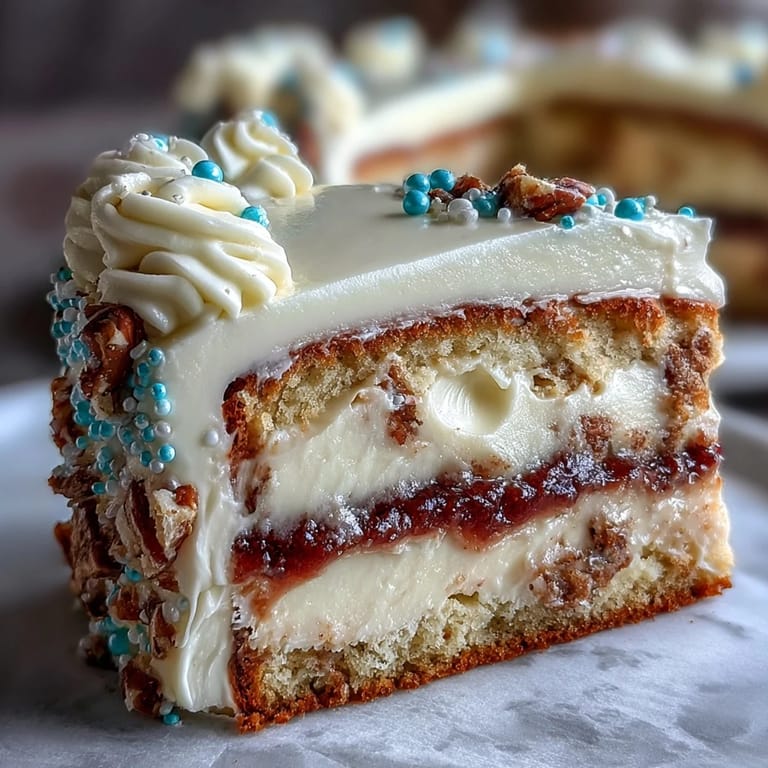
Save My sister called me in a panic three days before her graduation, asking if I could make her cake. She wanted something that looked magazine-worthy but wasn't impossibly complicated, and honestly, that's when I discovered the magic of a two-tier celebration cake. The moment I pulled those golden layers from the oven and caught that buttery vanilla aroma, I knew this would become my go-to formula for big moments. There's something about baking for someone's milestone that makes you want to get every detail right, but also reminds you that perfection is less important than the love baked into it.
I'll never forget watching my sister's face when she saw the finished cake on her graduation table, surrounded by friends taking photos. Someone asked if I'd ordered it from a bakery, and she proudly said, "My sister made it," with this proud grin I hadn't seen before. That's when I realized this cake wasn't just dessert—it became part of her memory of that day, something tangible she could share and taste.
Ingredients
- All-purpose flour (4 1/2 cups): The foundation of a tender crumb; sifting before measuring prevents a dense cake, though whisking into the dry ingredients works just fine in a pinch.
- Baking powder (3 1/2 tsp): This is your lift, so don't skimp or use old baking powder that's been sitting in your cabinet for two years—it loses potency.
- Salt (1/2 tsp): A small pinch that amplifies vanilla flavor and balances sweetness, making people wonder what makes your cake taste so complete.
- Granulated sugar (2 1/2 cups): Creaming this with butter creates tiny air pockets that make the cake light and airy rather than dense and heavy.
- Unsalted butter (1 1/2 cups for cake, 2 cups for frosting): Room temperature is non-negotiable here—cold butter won't cream properly and will sabotage your texture from the start.
- Large eggs (8 total): Room temperature eggs mix smoothly into the batter without shocking the temperature and creating lumps.
- Pure vanilla extract (2 tbsp for cake, 2 tbsp for frosting): Skip imitation vanilla if possible; the real thing makes a noticeable difference in depth and aroma.
- Whole milk (2 cups for cake, 1/2 cup for frosting): Room temperature milk prevents curdling when added to the butter-egg mixture.
- Powdered sugar (8 cups, sifted): Sifting removes lumps that would otherwise create grainy frosting—it's worth the three extra minutes.
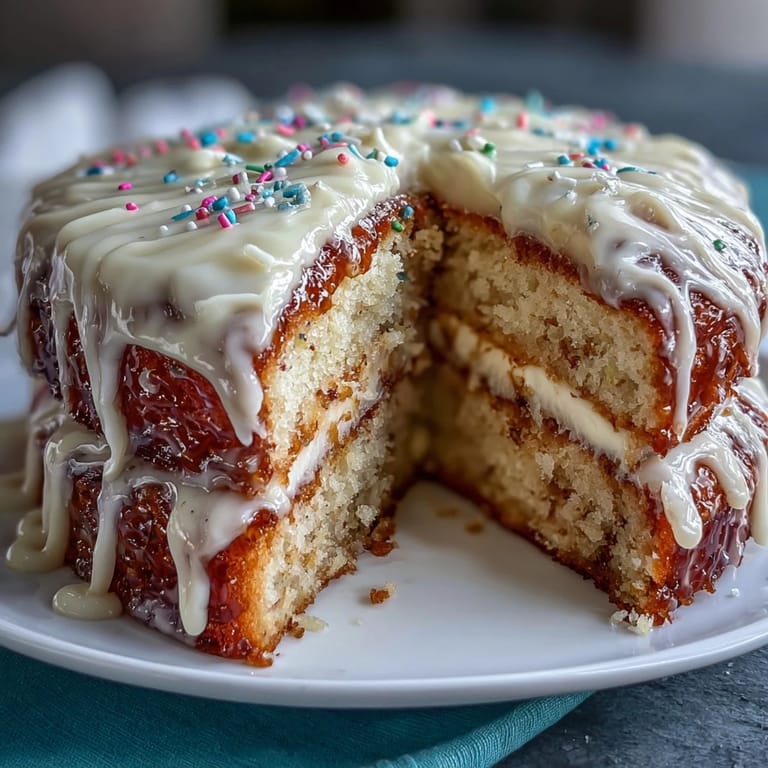
- Gel food coloring (optional): Gel coloring doesn't water down frosting like liquid dye does, so use it if you want vibrant graduation colors without sacrificing consistency.
- Balloon toppers and edible confetti: These turn a pretty cake into a celebration statement, and they're the easiest way to add personality without piping skills.
Tired of Takeout? 🥡
Get 10 meals you can make faster than delivery arrives. Seriously.
One email. No spam. Unsubscribe anytime.
Instructions
- Prep your pans and preheat:
- Set your oven to 350°F and line two 8-inch and two 6-inch round pans with parchment—this step matters because sticking is the enemy of a beautiful release. I learned the hard way that greasing alone sometimes betrays you halfway through frosting.
- Combine the dry ingredients:
- Whisk flour, baking powder, and salt together in a medium bowl, which aerates the flour and ensures leavening is evenly distributed. This takes about a minute and sets you up for a uniform crumb.
- Cream butter and sugar until fluffy:
- Beat them together for 3 to 5 minutes until the mixture looks pale and mousy—this is where your cake gets its lift and tender texture. You'll know it's right when it looks like frosting itself.
- Add eggs one at a time:
- This prevents lumps and ensures each egg fully incorporates before the next one arrives. If it looks slightly broken or curdled, don't panic; the milk will save it.
- Alternate flour and milk in three additions:
- Start with flour, add half the flour mixture, then half the milk, then the remaining flour, then the remaining milk, and finish with flour. This alternating method prevents overmixing and keeps the batter light.
- Divide batter and bake:
- Pour equal amounts into each pan and tap gently to release air bubbles, then bake 8-inch cakes for 35 to 40 minutes and 6-inch cakes for 25 to 30 minutes until a toothpick comes out clean. The smaller tiers will bake faster, so check them first.
- Cool completely:
- Let cakes rest in their pans for 10 minutes, then turn out onto wire racks—they're still fragile, so handle gently. Rushing this step leads to broken layers, so be patient.
- Make the buttercream frosting:
- Beat softened butter until creamy, then add powdered sugar gradually while mixing to avoid a powdered sugar cloud in your kitchen. Add milk and vanilla a tablespoon at a time, adjusting until the frosting spreads like a dream without being runny.
- Level and layer the cakes:
- If your cake tops are domed, use a serrated knife or cake leveler to create flat surfaces—this ensures your tiers stack straight instead of sliding. Place one 8-inch layer on your cake board, spread buttercream, and top with the second 8-inch cake; repeat with the 6-inch cakes.
- Apply a crumb coat and chill:
- Spread a thin first layer of frosting over both cakes to seal in crumbs, then refrigerate for 20 minutes so the final frosting goes on cleanly. This extra step is what separates a homemade look from a professional finish.
- Frost smoothly and stack:
- Apply your final frosting layer using an offset spatula and a turntable if you have one—slow rotation makes this easier. Stack the 6-inch tier centered on top of the 8-inch tier, and use dowels or straws inserted through the bottom layer to support the weight.
- Decorate with balloons and confetti:
- Insert balloon toppers at angles that feel celebratory, scatter edible confetti, and step back to admire your work. This is the moment when a cake becomes a centerpiece.
 Save
Save I've baked this cake for three graduations now, and each time someone asks for the recipe, I know they're tasting something that felt special enough to replicate. That's the real victory—not that it's complicated, but that it's reliable and makes people feel celebrated.
Why Vanilla Sponge Works for Celebrations
Vanilla is the backdrop that lets everything else shine—the frosting flavor, the person being celebrated, the moment itself. A fancy flavor might impress on paper, but vanilla reminds people why classic exists: it works. Plus, vanilla sponge is forgiving; it bakes evenly, stays moist for days, and pairs with any color scheme or decoration you dream up.
The Two-Tier Advantage
A two-tier cake looks impressive without requiring the structural engineering of a three or four-tier monster. It's tall enough to feel special, manageable enough to stack and frost without structural collapse, and feeds 20 to 24 people without being absurdly large for a home kitchen. I realized after my first attempt that sometimes elegance is just knowing when to stop.
Making This Cake Your Own
The beauty of this recipe is its flexibility—the buttercream can be tinted in school colors, the balloon toppers can match a theme, and you can flavor the cake itself with lemon or almond extract if vanilla feels too plain. I once made this cake with a hint of almond extract for someone whose favorite flavor was marzipan, and it became her favorite version. Here's how to make it feel personal:
- Add 1/2 teaspoon of lemon extract to the cake batter for a subtle citrus note that lifts the vanilla without overpowering it.
- Tint the buttercream using gel food coloring in the graduate's school colors, or swirl two colors together for a playful effect.
- Make or order balloon toppers ahead of time so decorating feels like the fun finale rather than a last-minute scramble.
 Save
Save Baking for celebrations is really about showing up for someone's moment and saying, "This matters to me." This cake does exactly that, reliably and beautifully.
Recipe FAQ
- → What size pans are used for the cake layers?
The cake uses two 8-inch and two 6-inch round pans to create the two-tier structure.
- → How is the buttercream frosting prepared?
Buttercream is made by beating unsalted butter until creamy, gradually adding powdered sugar, vanilla extract, salt, and milk or cream until smooth and spreadable.
- → Can the cake be tinted with colors?
Yes, gel food coloring can be added to the buttercream to customize the frosting colors.
- → What helps support the two-tier stacking?
Dowels or straws are used between tiers to provide structural support during stacking.
- → Are there any tips for ensuring moist cake layers?
Using room temperature ingredients and following the alternating flour and milk additions help maintain a moist, tender crumb.
- → What decorations complement the cake?
Playful balloon toppers and optional edible confetti or sprinkles add a festive finishing touch.